Creando una aplicación móvil usando expo

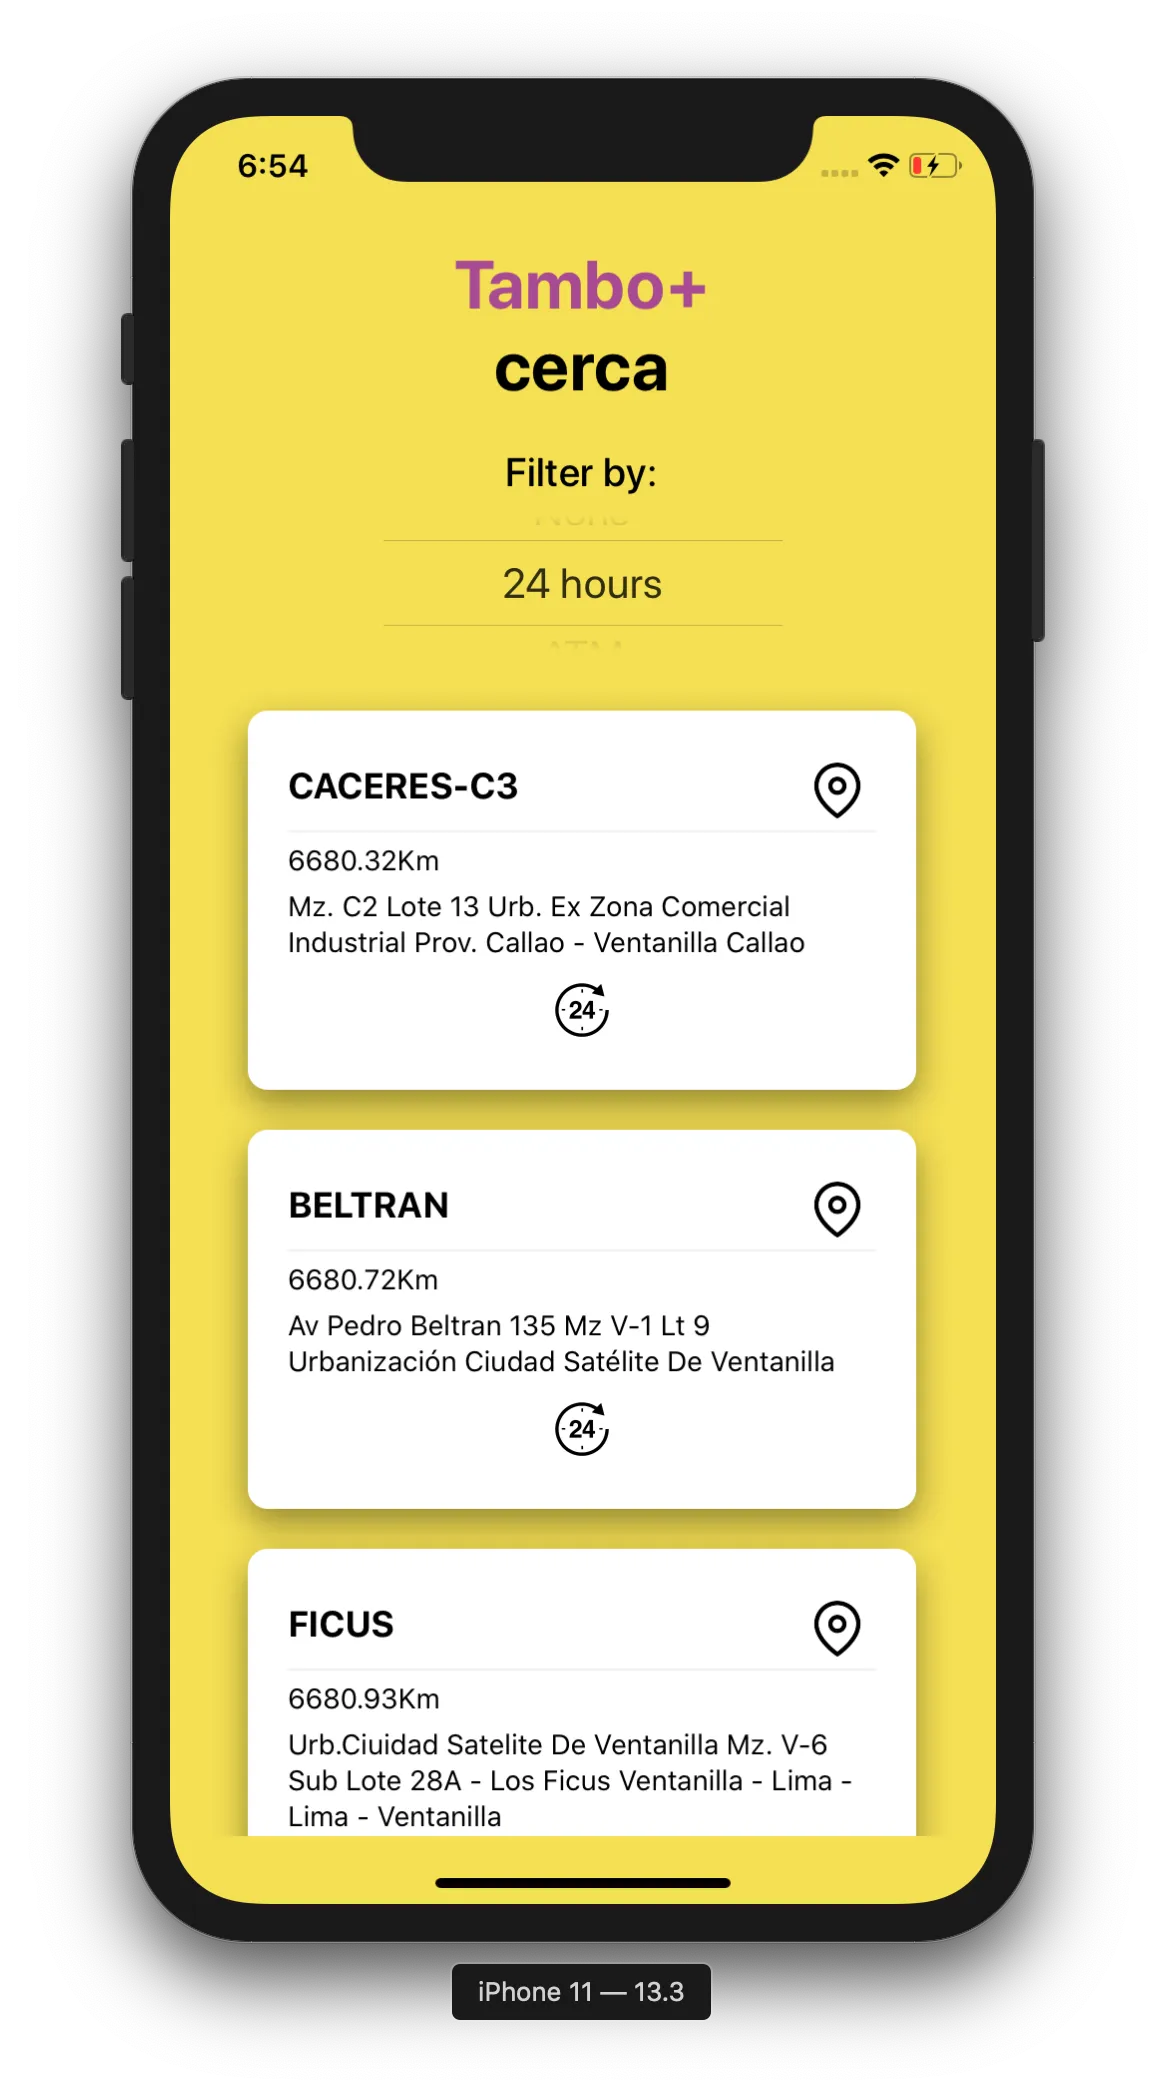
Vamos a crear una aplicación móvil usando react-native con Expo tomando como base una aplicación web https://tambo.cristianbgp.com/ hecha con React. Se trata de una aplicación que te muestra una lista de tiendas ordenadas según la cercanía.
Creando el proyecto
Para comenzar necesitamos tener instalado expo-cli, para instalarlo globalmente podemos usar npm o yarn.
Usando npm
npm install expo-cli --global
Usando yarn
yarn global add expo-cli
Una vez tenemos expo-cli podemos usar init para crear un nuevo proyecto
expo-cli init tambo
Ahora tendremos una estructura de archivos similar a
Podemos usar yarn start y seguir las indicaciones para abrir la aplicación en nuestros emuladores android y/o iOS

Paquetes que usaremos
Ahora instalemos las dependencias que vamos a usar
yarn add expo-constants expo-location react-native-svg swr
expo-constants: Para obtener algunas dimensiones constantes del dispositivo
expo-location: Para obtener las coordenadas del dispositivo
react-native-svg: Para poder usar svg dentro de react-native
swr: Para fetchear nuestra data
Código
Ahora ya estamos listos para comenzar y añadiremos el siguiente código a App.js que es nuestro archivo principal
// App.js
import React from "react";
import {
  StyleSheet,
  View,
  Text,
  SafeAreaView,
  Picker,
  Platform,
  ActivityIndicator,
} from "react-native";
import Constants from "expo-constants";
import * as Location from "expo-location";
import StoresList from "./components/store-list";
const statusBarHeight = Constants.statusBarHeight;

function Loader() {
  return (
    <View style={styles.loader}>
      <ActivityIndicator size="large" color="#000" />
    </View>
  );
}

export default function App() {
  const [selectedFilter, setSelectedFilter] = React.useState("");
  const [location, setLocation] = React.useState(null);
  const [errorMsg, setErrorMsg] = React.useState(null);
  const [refreshLocation, setRefreshLocation] = React.useState(true);

  React.useEffect(() => {
    async function getLocation() {
      let { status } = await Location.requestPermissionsAsync();
      if (status !== "granted") {
        setErrorMsg("Permission to access location was denied");
      }

      let location = await Location.getCurrentPositionAsync({});
      setLocation(location);
      setRefreshLocation(false);
    }
    if (refreshLocation) {
      getLocation();
    }
  }, [refreshLocation, setRefreshLocation]);

  function filterBy(store) {
    if (selectedFilter !== "") {
      return store[selectedFilter];
    } else {
      return true;
    }
  }

  return (
    <SafeAreaView
      style={[
        styles.container,
        Platform.OS === "android" && { marginTop: statusBarHeight },
      ]}
    >
      <View style={styles.header}>
        <Text style={[styles.title, { color: "#a74a93" }]}>Tambo+</Text>
        <Text style={styles.title}>cerca</Text>
      </View>
      {location ? (
        <>
          <View style={styles.filter}>
            <Text style={styles.subTitle}>Filter by:</Text>
            <Picker
              selectedValue={selectedFilter}
              style={styles.picker}
              itemStyle={styles.pickerItem}
              onValueChange={(itemValue) => setSelectedFilter(itemValue)}
            >
              <Picker.Item label="None" value="" />
              <Picker.Item label="24 hours" value="allday" />
              <Picker.Item label="ATM" value="atm" />
            </Picker>
          </View>
          <React.Suspense fallback={<Loader />}>
            <StoresList
              location={location}
              filterBy={filterBy}
              refreshLocation={refreshLocation}
              setRefreshLocation={setRefreshLocation}
            />
          </React.Suspense>
        </>
      ) : (
        <Loader />
      )}
      {errorMsg && <Text style={styles.error}>{errorMsg}</Text>}
    </SafeAreaView>
  );
}

const styles = StyleSheet.create({
  container: {
    flex: 1,
    backgroundColor: "#f5df53",
    alignItems: "center",
  },
  header: {
    marginVertical: 20,
    alignItems: "center",
  },
  title: {
    fontSize: 34,
    fontWeight: "700",
  },
  filter: {
    alignItems: "center",
    marginBottom: 10,
  },
  subTitle: {
    fontSize: 20,
    fontWeight: "500",
  },
  picker: {
    width: 200,
    height: Platform.OS === "ios" ? 88 : 44,
  },
  pickerItem: {
    height: Platform.OS === "ios" ? 88 : 44,
  },
  loader: {
    justifyContent: "center",
    alignItems: "center",
    margin: 20,
  },
  error: {
    fontSize: 18,
    paddingHorizontal: 50,
    marginVertical: 20,
    color: "red",
  },
});
Analicemos un poco lo que tenemos en App.js
React Native
Si es la primera vez que ven React Native podrán darse cuenta que los únicos elementos que podemos renderizar son los que recibimos de react-native(View y Text por ejemplo) y que la forma de dar estilos a nuestros elementos es con un objeto que se lo pasamos al prop style, además de que los nombres de los estilos son similares a los que usamos en css.
SafeAreaView
Estamos usando un SafeAreaView para que nuestros componentes no ocupen desde la barra superior en nuestros smartphones, ésto es porque hay smartphones que tienen camera notches y la pantalla de la aplicacion se extiende totalmente, sin embargo, SafeAreaView sólo funciona en iOS, así que para solucionarlo en Android usamos Constants.statusBarHeight de expo-constants para asignar ese valor un como un marginTop.
Location
Usamos expo-location y corremos un efecto de React para obtener las coordenadas del dispositivo, si no obtenemos los permisos de localización mostramos un mensaje de error en errorMsg.
Picker
Usamos Picker y Picker.Item para poder crear nuestro filtro con opciones, es similar a lo que haríamos en web con select y option. Picker tiene un prop onValueChange donde podemos actualizar nuestro selectedFilter.
StoresList
Ahora pasemos a otro componente StoresList, que es el que se encarga de renderizar nuestra lista de tiendas.
// /components/stores-list.js
import React from "react";
import { View, FlatList, StyleSheet } from "react-native";
import useSWR from "swr";
import StoreCard from "./store-card";
function fetcher(url) {
return fetch(url).then((res) => res.json());
}
export default function StoresList({
location,
filterBy,
refreshLocation,
setRefreshLocation,
}) {
const { data: responseStores, revalidate } = useSWR(
`https://tambo-api.herokuapp.com/nearest?currentLatitude=${location.coords.latitude}¤tLongitude=${location.coords.longitude}`,
fetcher,
{ suspense: true }
);
function onRefresh() {
setRefreshLocation(true);
revalidate();
}
return (
<View style={styles.container}>
<FlatList
data={responseStores.filter(filterBy)}
renderItem={({ item: store, index }) => {
const isFirst = index === 0;
return (
<View style={styles.cardExtraContainer}>
<StoreCard key={store.id} store={store} isFirst={isFirst} />
</View>
);
}}
keyExtractor={(item) => item.id}
onRefresh={onRefresh}
refreshing={refreshLocation}
/>
</View>
);
}
const styles = StyleSheet.create({
container: {
flex: 1,
},
cardExtraContainer: {
alignItems: "center",
},
});
Podemos notar que para renderizar nuestra lista usamos un componente de react-native llamado FlatList que nos permite crear listas que uno puede scrollear. En el prop data le damos nuestra lista en un array, en el prop renderItem le tenemos que dar el componente que queremos renderizar por cada item y en el prop keyExtractor le tenemos que dar un valor único por cada item(en nuestro caso, cada item tiene un id).
Obtener la data
Para poder obtener la data del api usamos swr, el cual nos pide la url del endpoint de la data y una función fetcher(en nuestro caso usamos un fetcher básico). Además podemos suspender nuestro componente y mostrar otro componente mientras aún no recibimos la data del api. Por eso StoresList está envuelto en React.Suspense que tiene un fallback mostrando un componente Loader.
StoreCard
Ahora pasemos al componente que se encarga de renderizar la información de cada tienda
// /components/store-card.js
import React from "react";
import {
  View,
  Text,
  StyleSheet,
  TouchableOpacity,
  Linking,
} from "react-native";
import { ATMIcon, AllDayIcon, MapPinIcon } from "./icons";

export default function StoreCard({ store, isFirst }) {
  function handleOnPress() {
    Linking.openURL(
      `https://maps.google.com/?q=${store.latitude},${store.longitude}`
    );
  }

  return (
    <TouchableOpacity
      onPress={handleOnPress}
      style={[styles.container, isFirst && { marginTop: 10 }]}
    >
      <View
        style={{
          flexDirection: "row",
          justifyContent: "space-between",
          alignItems: "center",
        }}
      >
        <Text style={styles.title}>{store.name}</Text>
        <View style={styles.iconContainer}>
          <MapPinIcon />
        </View>
      </View>
      <View style={styles.divider} />
      <Text style={styles.distance}>
        {store.distance < 1000
          ? `${parseInt(store.distance)}m`
          : `${(store.distance / 1000).toFixed(2)}km`}
      </Text>
      <Text style={styles.address}>{store.address.toLowerCase()}</Text>
      <View style={styles.iconsSection}>
        {store.allday && (
          <View style={styles.iconContainer}>
            <AllDayIcon />
          </View>
        )}
        {store.atm && (
          <View style={styles.iconContainer}>
            <ATMIcon />
          </View>
        )}
      </View>
    </TouchableOpacity>
  );
}

const styles = StyleSheet.create({
  container: {
    backgroundColor: "#fff",
    width: "90%",
    borderRadius: 10,
    padding: 20,
    marginBottom: 20,
    //shadow
    shadowColor: "#000",
    shadowOffset: {
      width: 0,
      height: 7,
    },
    shadowOpacity: 0.41,
    shadowRadius: 9.11,
    elevation: 14,
  },
  title: {
    fontSize: 18,
    fontWeight: "700",
    marginBottom: 5,
  },
  divider: {
    borderBottomWidth: 1,
    borderColor: "#efefef",
    marginBottom: 5,
  },
  distance: {
    fontSize: 14,
    lineHeight: 18,
    marginBottom: 5,
    textTransform: "capitalize",
  },
  address: {
    fontSize: 14,
    lineHeight: 18,
    marginBottom: 5,
    textTransform: "capitalize",
  },
  iconsSection: {
    flexDirection: "row",
    justifyContent: "center",
  },
  iconContainer: {
    width: 40,
    height: 40,
    justifyContent: "center",
    alignItems: "center",
  },
});
Redirigir a Google Maps
Nuestro componente StoreCard esta envuelto con TouchableOpacity que viene de react-native para poder tener el evento onPress y crear nuestra función que se ejecuta al momento de hacer “click”, nuestra función que se ejecuta es handleOnPress en donde se usa Linking.openURL para poder redireccionar a una url(Linking tambien viene de react-native).
Íconos
Habrán notado que usamos tres íconos en la aplicación, ATMIcon que se muestra si la tienda tiene un cajero, AllDayIcon si la tienda atiende las 24 horas, MapPinIcon simplemente ilustrativo para mostrar que tenemos la ubicación de las tiendas. Todos éstos íconos están en svg, sin embargo, React Native no soporta svg de forma natural, por eso tenemos una forma particular para poder usarlos dentro de React Native.
// /components/icons.js
import React from "react";
import { SvgXml } from "react-native-svg";

const mapPinXml = `
<svg
  xmlns="http://www.w3.org/2000/svg"
  width="24"
  height="24"
  viewBox="0 0 24 24"
  fill="none"
  stroke="black"
  stroke-width="2"
  stroke-linecap="round"
  stroke-linejoin="round"
  class="feather feather-map-pin"
>
  <path d="M21 10c0 7-9 13-9 13s-9-6-9-13a9 9 0 0 1 18 0z"></path>
  <circle cx="12" cy="10" r="3"></circle>
</svg>
`;

export function MapPinIcon() {
  return <SvgXml xml={mapPinXml} width="100%" height="100%" />;
}
Éste es un ejemplo con MapPinIcon en el cual usamos react-native-svg para obtener SvgXml y renderizarlo de esa manera. Y En donde necesitemos usarlo lo envolvemos en un componente contenedor View con las medidas que queramos.
<View
  style={{
    width: 40,
    height: 40,
    justifyContent: "center",
    alignItems: "center",
  }}
>
  <MapPinIcon />
</View>
Así tenemos nuestra aplicación tal cual la mostramos al comienzo, pueden encontrar todo el código en Github